 Topic Name: My first frame bag attempt Topic Name: My first frame bag attempt
|
on: October 08, 2014, 08:03:35 AM
|
thechickencow
Posts: 15

|
 |
« on: October 08, 2014, 08:03:35 AM » |
|
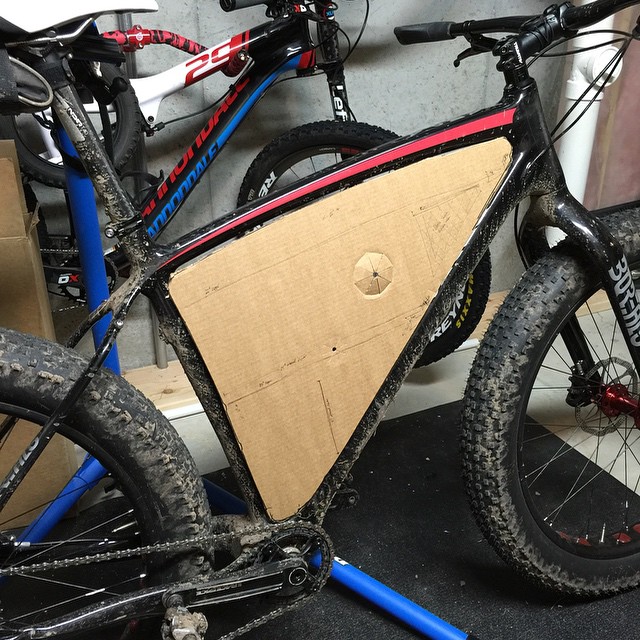
This is going on my Borealis Yampa, it's an XL. I've ordered up fabric, zippers, etc. It'll be VX21 with some 400x300 for interior. Zippers are the water resistant ones. Got a template laid out, thought you guys could help. Question I've got (and thanks for helping), should I try to size the side panels and have them to fit the size of the opening INTERIOR to the frame, or have them so they come up and wrap a bit around the frame a hair? I've seen both ways? Here's my template:  I'm using a lot of ideas from other bags, took a really deep look at a friend's Revelate Salsa bag and have the luxury of looking online at many of the bag makers ideas. I'm intending to "borrow with pride" quite a bit, knowing my first bag may be a bit rougher than the picture in my head. I do however intend to have something very functional off the start. I've got sewing experience so that doesn't scare me so much and I like figuring stuff like this out.  Luxury of my XL frame and something nice for me finally being 6'4" is that I'll have a lot of room. Intending on a double zipper on the drive side with interior dividers (velcro) that will separate top/bottom of the bag. Intending on mesh pockets interior to the top section to give room for small items to have a place designated - I'll probably do a few compartments in this mesh pocket so I can have room for snacks, tool, etc. On the non-drive side, I'm intending to have a map pocket, with some red interior to make the pocket and provide a good non-black interior color for finding things inside. I may do some flannel lining inside there for electronic stuff. I'm also wondering if I should sew flannel or fleece or something on the underside of the velcro to protect the frame a bit? |
|
|
|
« Last Edit: October 08, 2014, 08:07:26 AM by thechickencow »
|
 Logged
|
|
|
|
 Topic Name: My first frame bag attempt Topic Name: My first frame bag attempt
|
Reply #1 on: October 09, 2014, 05:47:53 PM
|
thechickencow
Posts: 15

|
 |
« Reply #1 on: October 09, 2014, 05:47:53 PM » |
|
Lots of views, no replies... thoughts on this? Question I've got (and thanks for helping), should I try to size the side panels and have them to fit the size of the opening INTERIOR to the frame, or have them so they come up and wrap a bit around the frame a hair? I've seen both ways? |
|
|
|
|
 Logged
|
|
|
|
 Topic Name: My first frame bag attempt Topic Name: My first frame bag attempt
|
Reply #2 on: October 10, 2014, 08:25:18 AM
|
Adam Alphabet
Location: Vancouver, BC
Posts: 968

|
 |
« Reply #2 on: October 10, 2014, 08:25:18 AM » |
|
Hi,
If you're talking about the perimeter of the bag; along the inside of the seat,down and top tubes most people go wider than the tubes. I think 2" to 2 1/2" is pretty standard, some taper the front end of the bag to flair out.
For the side panels, I'll speak to what I do. I size the ones I make as true to the inside frame space as possible. In my opinion frame bags that are too big look sloppy when they're bunched up, it doesn't look good and may (potentially) have an effect on the zipper functioning. To some this doesn't matter, to me it does. I like my pants to fit properly, not hang half way down my ass and drag on the ground if you know what I mean.
|
|
|
|
|
 Logged
|
@adamalphabet
|
|
|
 Topic Name: My first frame bag attempt Topic Name: My first frame bag attempt
|
Reply #3 on: October 11, 2014, 08:10:11 AM
|
Smo
Location: Flagstaff, AZ
Posts: 138


|
 |
« Reply #3 on: October 11, 2014, 08:10:11 AM » |
|
I usually go wider than the frame itself. 2.5" for most frames, 2" for skinny steel tubes or really big bags without a divider in the middle. In general, it helps to slightly upsize a framebag - you can always tighten the bag by tightening your velcro, but you can't make it bigger. I made that mistake on my first MYOG bag. It was a tight fit and looked good, but I can fit more in the bag that replaced it.
I made my road bike's framebag skinnier for looks, but I still went a little wider than the frame. Having the bag wider for bikepacking also means that I can really cram things in there at the start of a trip or if I just stopped and filled up at a water source (pretty common in AZ to carry a lot of water, and I can fit a nearly full 6-liter dromedary in my bag.
To each his own!
|
|
|
|
|
 Logged
|
|
|
|
 Topic Name: My first frame bag attempt Topic Name: My first frame bag attempt
|
Reply #4 on: October 12, 2014, 08:50:58 AM
|
Adam Alphabet
Location: Vancouver, BC
Posts: 968

|
 |
« Reply #4 on: October 12, 2014, 08:50:58 AM » |
|
Language wise I find it's always been a bit confusing in these conversations as to what people are calling the part of the frame bag that runs along the inside of the seat tube, down tube and top tube. This, in my opinion should be wider to optimize space frame bag volume. As mentioned I thinks 2 to 2.5" is pretty standard. I agree SMO, if you've got an old 80's steel road frame it'd be wasteful to make a super narrow frame bag, say like 1" wide to match the tube width.
And perhaps thechickencow will chime in, but I think he was talking specifically about the panels where zipper would be added, like the flag part of your AZ flag bag (which was super sick btw). I like to make these as true to size as possible. Too small and you end up tensioning the bag too much, which also limits volume optimization and stresses the zipper and straps. Too large and it looks sloppy, and also negatively effects zipper functioning by not having enough tension.
Truly each their own though, That's the best part of these myog forums and with bikepacking bag construction still being reasonably new, there are still tonnes of ideas out there to be discovered, tested and shared. There is no 'best' way for a lot of this stuff yet.....thankfully, otherwise everybody would just copy each other and there'd be no progression.
|
|
|
|
|
 Logged
|
@adamalphabet
|
|
|
 Topic Name: My first frame bag attempt Topic Name: My first frame bag attempt
|
Reply #5 on: October 12, 2014, 02:48:32 PM
|
Smo
Location: Flagstaff, AZ
Posts: 138


|
 |
« Reply #5 on: October 12, 2014, 02:48:32 PM » |
|
Addy: After re-reading, you're definitely right about what the OP was referring to. So yeah, I just *slightly* upsize the sides of the bags ("faces" is maybe a better term?). Like, 1/4 inch. So not really enough to worry about.
|
|
|
|
|
 Logged
|
|
|
|
 Topic Name: My first frame bag attempt Topic Name: My first frame bag attempt
|
Reply #6 on: October 13, 2014, 11:40:19 AM
|
thechickencow
Posts: 15

|
 |
« Reply #6 on: October 13, 2014, 11:40:19 AM » |
|
Yeah, sorry I was out for a few days.
I am talking about the big flat side panels - trying to see how big to make them. It seemed that I could just tighten the straps to keep the flat panels tight but I won't lose space that way.
Thank you all for the input so far.
For the other discussion on width - I am going to make it the width of the down tube, which is wider than both the top tube and seat post.
|
|
|
|
|
 Logged
|
|
|
|
 Topic Name: My first frame bag attempt Topic Name: My first frame bag attempt
|
Reply #7 on: October 13, 2014, 11:41:45 AM
|
thechickencow
Posts: 15

|
 |
« Reply #7 on: October 13, 2014, 11:41:45 AM » |
|
Addy: After re-reading, you're definitely right about what the OP was referring to. So yeah, I just *slightly* upsize the sides of the bags ("faces" is maybe a better term?). Like, 1/4 inch. So not really enough to worry about.
For what it's worth, my template is just big enough that it won't fit inside the triangle, but isn't too big that it really covers the tubes either. Think that should work? I'll be adding 3/8" seam allowance around the whole thing I think. |
|
|
|
|
 Logged
|
|
|
|
 Topic Name: My first frame bag attempt Topic Name: My first frame bag attempt
|
Reply #8 on: October 13, 2014, 02:54:19 PM
|
Smo
Location: Flagstaff, AZ
Posts: 138


|
 |
« Reply #8 on: October 13, 2014, 02:54:19 PM » |
|
Sounds like it would work to me. I measure precisely, then add 1/2" around and sew with a 3/8" seam allowance, so that adds that an extra 1/8" to the bag on all sides.
|
|
|
|
|
 Logged
|
|
|
|
 Topic Name: My first frame bag attempt Topic Name: My first frame bag attempt
|
Reply #9 on: October 13, 2014, 04:38:27 PM
|
thechickencow
Posts: 15

|
 |
« Reply #9 on: October 13, 2014, 04:38:27 PM » |
|
Thanks. Hope to start seeing/cutting this week.
|
|
|
|
|
 Logged
|
|
|
|
 Topic Name: My first frame bag attempt Topic Name: My first frame bag attempt
|
Reply #10 on: October 26, 2014, 06:52:32 AM
|
thechickencow
Posts: 15

|
 |
« Reply #10 on: October 26, 2014, 06:52:32 AM » |
|
Still haven't started, maybe this week.
|
|
|
|
|
 Logged
|
|
|
|
 Topic Name: My first frame bag attempt Topic Name: My first frame bag attempt
|
Reply #11 on: October 29, 2014, 07:51:09 AM
|
thechickencow
Posts: 15

|
 |
« Reply #11 on: October 29, 2014, 07:51:09 AM » |
|
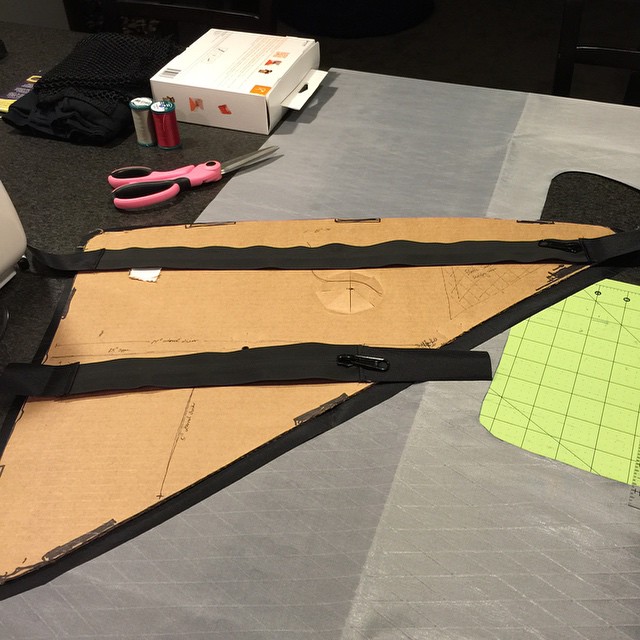
Got a bit of a start last night. I'm not sure if I did what I wanted to do for the little zipper "covers" I want to make to keep water/snow/ice out. I have to think about those. All I did last night was make the strips that I'll have for the zippers on the drive side. More than anything it was figuring out stuff like thread tension and such for the thread I've picked versus normal thread on the machine. I'm used to a much older machine and I'm using my wife's newer machine now.  |
|
|
|
|
 Logged
|
|
|
|
 Topic Name: My first frame bag attempt Topic Name: My first frame bag attempt
|
Reply #12 on: November 04, 2014, 08:49:26 PM
|
thechickencow
Posts: 15

|
 |
« Reply #12 on: November 04, 2014, 08:49:26 PM » |
|
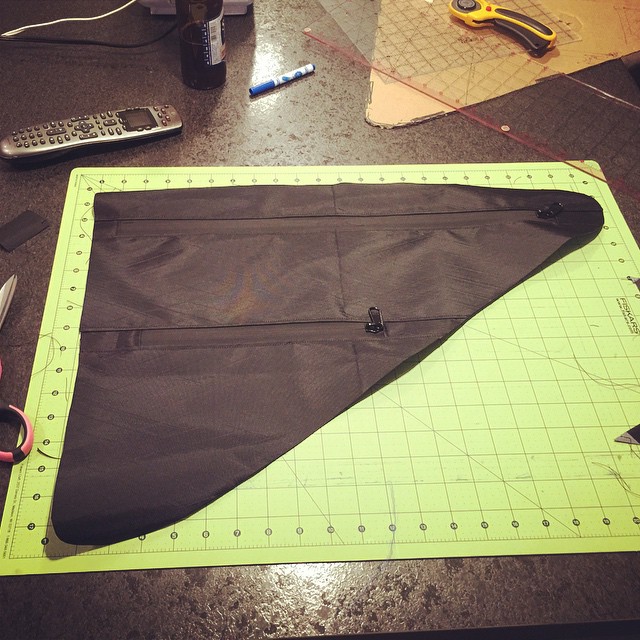
First side panel is done for the most part.  |
|
|
|
|
 Logged
|
|
|
|
 Topic Name: My first frame bag attempt Topic Name: My first frame bag attempt
|
Reply #13 on: December 01, 2014, 09:39:00 PM
|
thechickencow
Posts: 15

|
 |
« Reply #13 on: December 01, 2014, 09:39:00 PM » |
|
I'll update more later, but I skipped our local group ride tonight and made this:  |
|
|
|
|
 Logged
|
|
|
|
 Topic Name: My first frame bag attempt Topic Name: My first frame bag attempt
|
Reply #14 on: December 06, 2014, 11:36:41 AM
|
brankulo
Posts: 61

|
 |
« Reply #14 on: December 06, 2014, 11:36:41 AM » |
|
can we see more?
|
|
|
|
|
 Logged
|
|
|
|
 Topic Name: My first frame bag attempt Topic Name: My first frame bag attempt
|
Reply #15 on: December 08, 2014, 10:22:53 AM
|
thechickencow
Posts: 15

|
 |
« Reply #15 on: December 08, 2014, 10:22:53 AM » |
|
can we see more?
What do you want to see more of, which parts? I've had a couple rides now to test and the bag is fantastic. I'm bummed the velcro doesn't match up perfect but it works perfect anyway. |
|
|
|
|
 Logged
|
|
|
|
 Topic Name: My first frame bag attempt Topic Name: My first frame bag attempt
|
Reply #16 on: December 08, 2014, 10:34:07 AM
|
brankulo
Posts: 61

|
 |
« Reply #16 on: December 08, 2014, 10:34:07 AM » |
|
maybe interior shots, shots from building process
|
|
|
|
|
 Logged
|
|
|
|
 Topic Name: My first frame bag attempt Topic Name: My first frame bag attempt
|
Reply #17 on: December 08, 2014, 01:03:07 PM
|
thechickencow
Posts: 15

|
 |
« Reply #17 on: December 08, 2014, 01:03:07 PM » |
|
|
|
|
|
|
 Logged
|
|
|
|
 Topic Name: My first frame bag attempt Topic Name: My first frame bag attempt
|
Reply #18 on: December 08, 2014, 01:44:07 PM
|
brankulo
Posts: 61

|
 |
« Reply #18 on: December 08, 2014, 01:44:07 PM » |
|
thanks,
my first bag ended up twisting as well, now i am ready for new one. i as well tried mesh pocket and will not be doing it again. i will be reinforcing middle panel with 1/8" foam this time and possibly using stretch cord for attachment to top tube instead of velcro. i might try to use mounting points for bottle on down and seat tubes as well, just to eliminate as much velcro as possible.
|
|
|
|
|
 Logged
|
|
|
|
 Topic Name: My first frame bag attempt Topic Name: My first frame bag attempt
|
Reply #19 on: December 10, 2014, 06:03:55 PM
|
plesurnpain
Location: Heber, Utah
Posts: 57

|
 |
« Reply #19 on: December 10, 2014, 06:03:55 PM » |
|
I just finished mine too. I did one main pocket on the drive side and a small item pocket on the non drive side. I added a key holder which is nice and very easy if you're doing the pocket anyway. i used nylon instead of mesh since it's easier to work with. I had a little twist at the top front corner, but it came out better than I thought it would. I learned a lot that I'll use for future bags.
|
|
|
|
|
 Logged
|
|
|
|
|
|