 Topic Name: Budget build... Topic Name: Budget build...
|
on: July 01, 2011, 05:20:45 PM
|
CrazyAboutUltras
Location: Arlington, TX
Posts: 13


|
 |
« on: July 01, 2011, 05:20:45 PM » |
|
Well I am a newb to bikepacking, but am intrigued. I have never been much into hiking, but am an avid trail runner, and road cyclist.
I am surprised I have barely stumbled onto this "sport".
So with that I am also, not big on spending money...I have 2 bikes that I regularly ride on the local MTB trails here in DFW.
One is a Mongoose Blackcomb full suspension that I picked up in a trade, and the other is a German Fischer rigid frame.
I know neither are your ideal bikes for off road travel, but they have both held up well to hundreds of singletrack miles around town.
So my ideas are replace a few of the cheaper components on the blackcomb(to include a lockout rear suspension). The problem here is that this is still a 37lb bike. I'd hate to lug this thing up any steep hills hike a bike sections.
The Fischer has no suspension what so ever and is a rough ride. My rear is sore after 20 miles...really sore...and it feels a bit large for me frame wise.
3rd option is to pick up a cheap bike and build it up. I saw a few decent priced old school hard rocks, a trek 820, a Giant ATX for under $200. If I could talk these down closer to $100 I would jump on them.
Thoughts so far?
Next step if I go with the Fischer or one of the above mentioned bikes, I think switching to singlespeed would be the most cost effective way to go. I'd avoid the usage of cheap gears, cables, derailleurs, and any problems that these may cause on the trail.
After that, I am open to ideas...
Wheels, seats, handlebars, shocks, etc.
I'll worry about strapping gear on when I get a bike worked out.
As far as trails. I forsee, anything around TX, AZ, NM, CO.
Thanks
|
|
|
|
|
 Logged
|
|
|
|
 Topic Name: Budget build... Topic Name: Budget build...
|
Reply #1 on: July 02, 2011, 04:49:32 PM
|
CrazyAboutUltras
Location: Arlington, TX
Posts: 13


|
 |
« Reply #1 on: July 02, 2011, 04:49:32 PM » |
|
OK so plans are made. I spent the day at work researching bikes, frames and such...
I came to the conclusion that I'm going to give full rigid a go.
The plan:
1.Sell the Mongoose, I have been itching for a new bike anyway, and it gets ridden second behind the roadie, so first to go.
2.Use the proceeds from the Mongoose to purchase a 90's mountain bike. I've seen several specialized, Giant, Trek full rigid that will fit the bill.
3.My friend, who is taller than me is totally for tagging along on some adventures, so I will let him build up the Fischer(or Fischer DIE-FAHRRADMARKE), which was marketed originally as "used for trekking" if my German translates correctly.
4. We both think single speed sounds awesome. We will be doing low budget conversions as per Sheldon Browns site/Single Speed outlaw's site. The Fischer so happens to have the horizontal dropout that should save $$ on the chain tensioner.
So stay tuned, this is going to be a 2 at once build. We are shooting for our first overnighter ride in August.
|
|
|
|
|
 Logged
|
|
|
|
 Topic Name: Budget build... Topic Name: Budget build...
|
Reply #2 on: July 05, 2011, 08:01:37 PM
|
CrazyAboutUltras
Location: Arlington, TX
Posts: 13


|
 |
« Reply #2 on: July 05, 2011, 08:01:37 PM » |
|
Single Speed conversion #1 is complete. Kinda... The Fischer before: 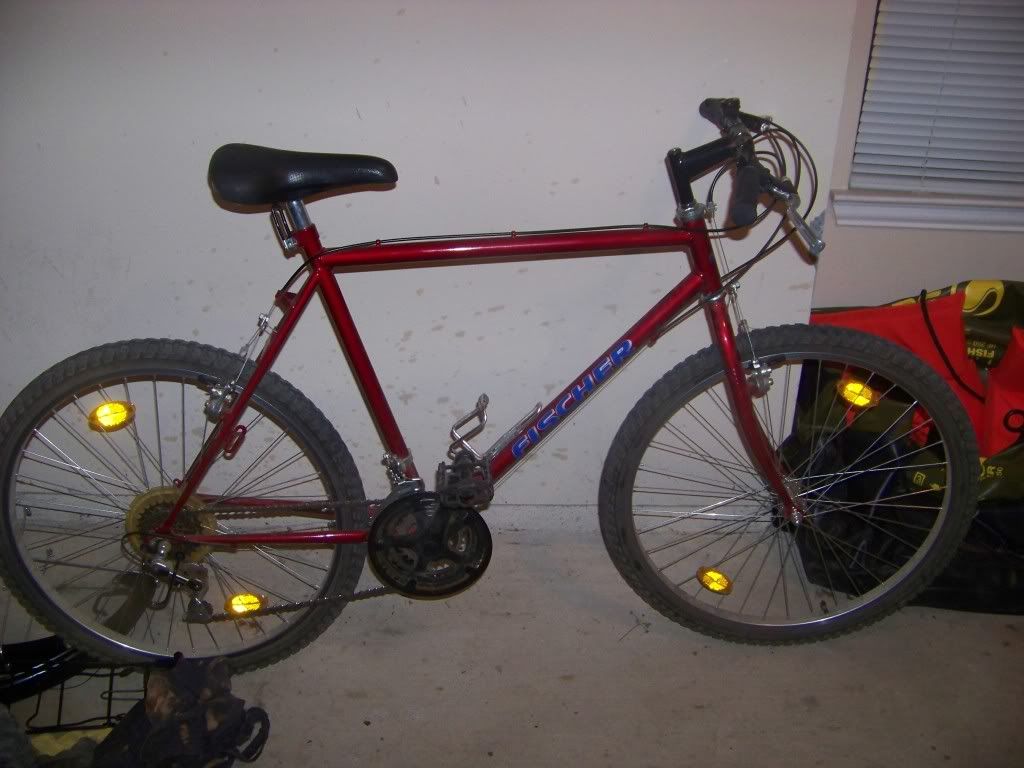 We started by taking off all the unneeded crap. Took a little while to figure out how to remove the rear cassette. Eventually after removing the cogs and losing all the ball bearings inside I figured out what I was doing. Unfortunately there was not a tool that fit this freewheel so a pair of pliers worked just fine. 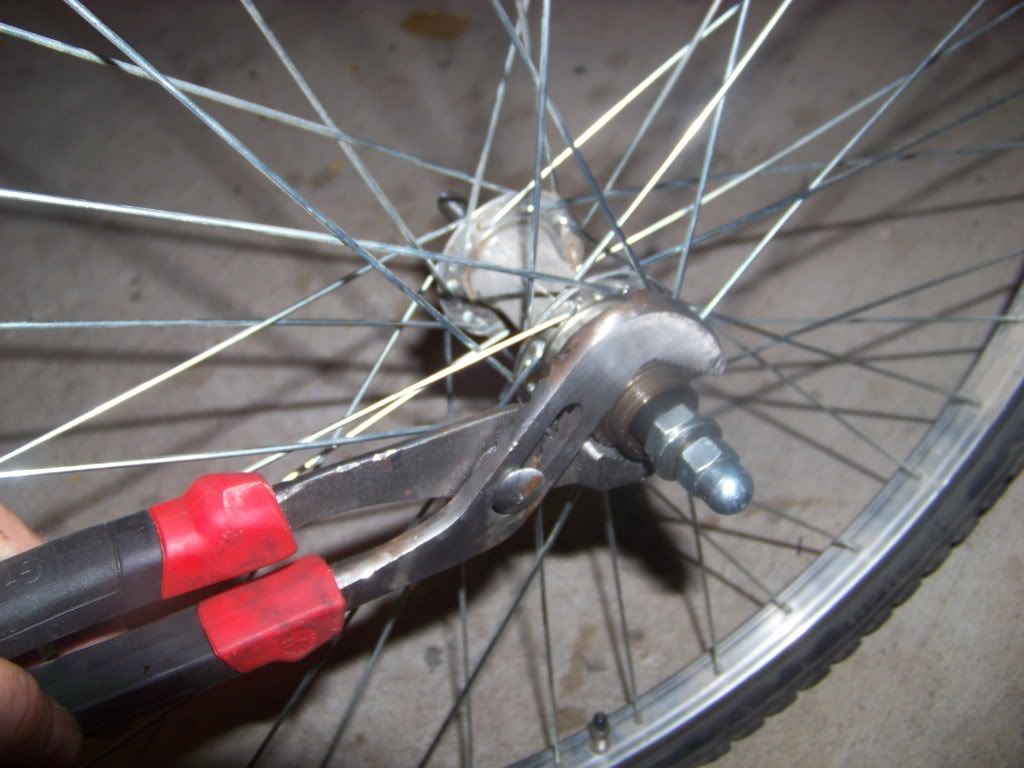 July 4th the bike shops were closed of course, but made it there today. Picked up a singlespeed freewheel cog, a crank removal tool, and a chain separator. 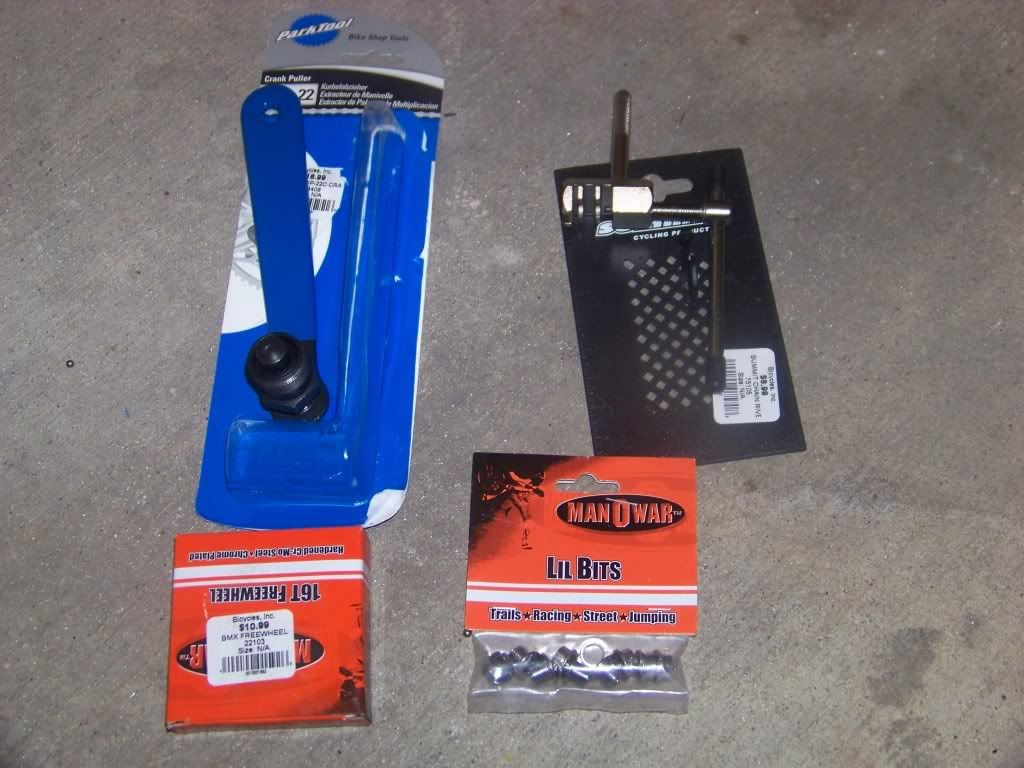 Easily got the new cog put on. Then I removed the crank arm, and ground out the 5 rivets to remove the chain ring assembly. To my dismay the big chain rig was integrated in the crank. 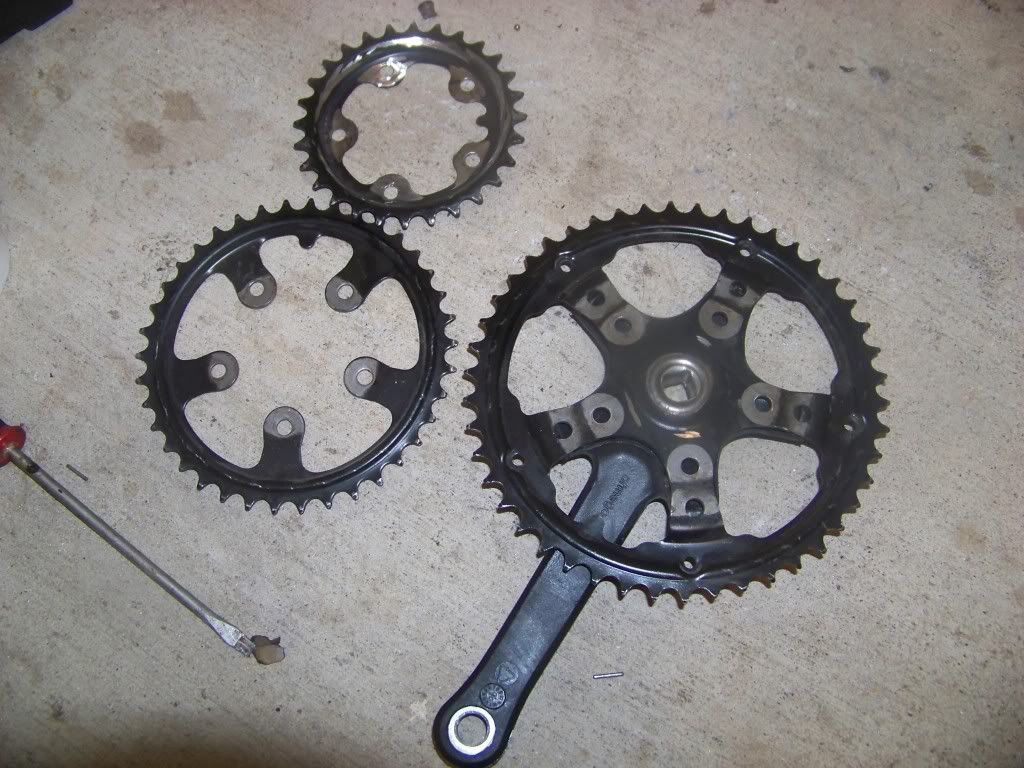 I was hoping to use the middle chain ring, but see below for more on that... So get the chain ring mounted, and measure out the chain. It was a pain getting it back together after removing the link but got it. Then came the problem I was worried about. The angle of the chain sucked and I kept throwing the chain. I made a few minor adjustment to keep it on just to ride around the street a bit. It is way to noisy and unstable to trust as is. Here is a pic of the chain angle. 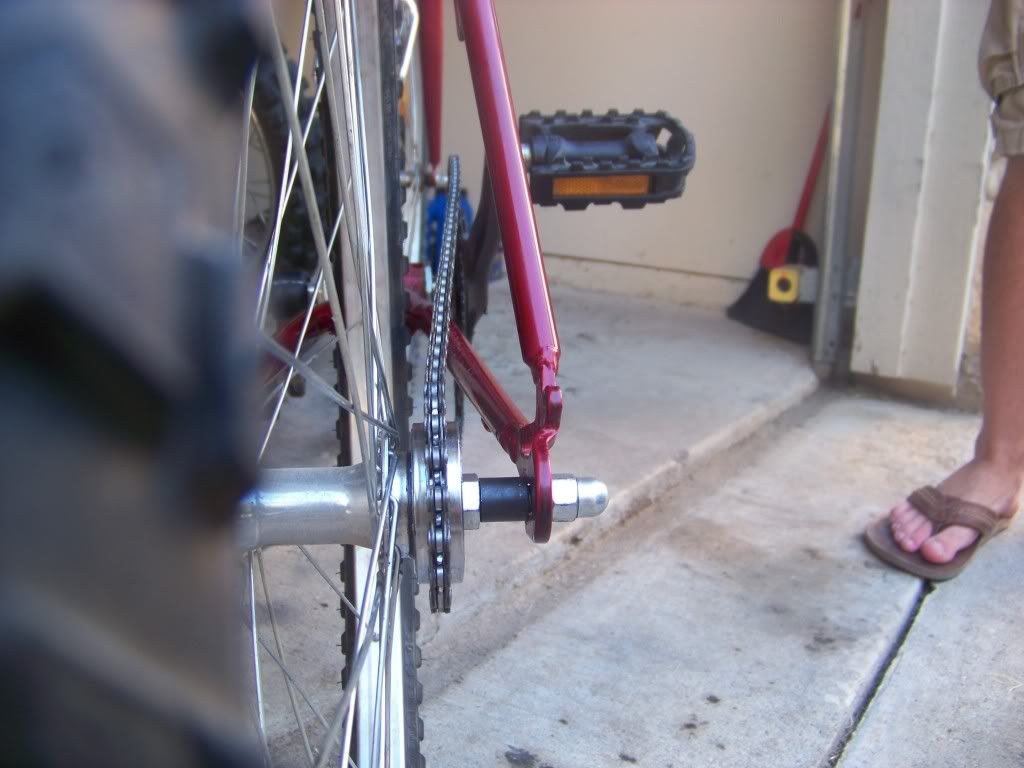 I am guessing I will have to remount the middle chain ring and use that. I guess I will have a 2x1...haha... Oh well first single speed is pretty much done  Tomorrow I'll get out there and get that second chain ring on and redo the chain length. Project so far: 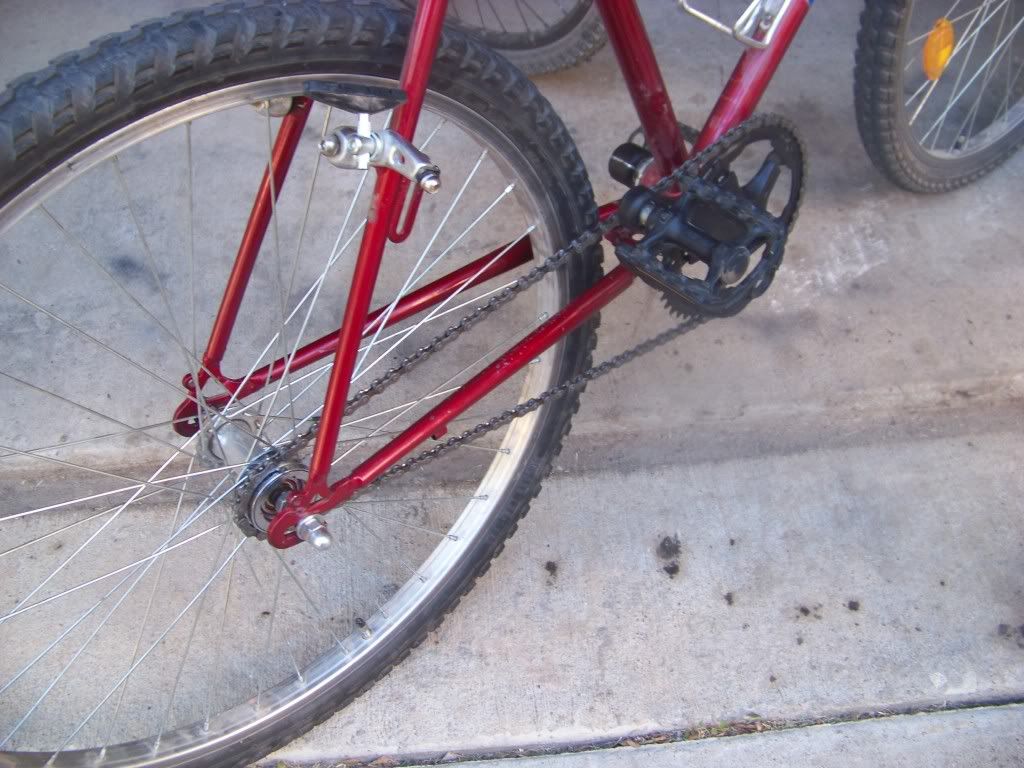 Total so far $47... $8.99 will be returned because I didnt use the BMX chain ring bolt. $16.99 for the crank tool and $6.95 for the chain tool. So really the project is at $10.95 for the freewheel cog. |
|
|
|
|
 Logged
|
|
|
|
 Topic Name: Budget build... Topic Name: Budget build...
|
Reply #3 on: July 05, 2011, 08:11:18 PM
|
paxton coyote
Location: Paxton, Nebraska
Posts: 166


|
 |
« Reply #3 on: July 05, 2011, 08:11:18 PM » |
|
if you're going to use the middle chain ring up front perhaps you can mount another cog in the rear & have a dinglrspeed!
|
|
|
|
|
 Logged
|
|
|
|
 Topic Name: Budget build... Topic Name: Budget build...
|
Reply #4 on: July 10, 2011, 06:09:50 AM
|
CrazyAboutUltras
Location: Arlington, TX
Posts: 13


|
 |
« Reply #4 on: July 10, 2011, 06:09:50 AM » |
|
Quick update:
$6.00 for some nuts and bolt and I have the middle chain ring bolted back up.
It is an official "almost" single-speed lol. So far I am pleased with the way it all is rolling. I need to put some pavement miles on it before I trust it on the trail. Also have some cool ideas for bike bags.
Still shopping for bike #2. Haven't found anything that I like...
|
|
|
|
|
 Logged
|
|
|
|
 Topic Name: Budget build... Topic Name: Budget build...
|
Reply #5 on: July 15, 2011, 06:27:58 PM
|
CrazyAboutUltras
Location: Arlington, TX
Posts: 13


|
 |
« Reply #5 on: July 15, 2011, 06:27:58 PM » |
|
Test ride #1: fail.
To get out to my main road you have to climb a 5%-6% inclne. I threw the chain 3 times. Pretty much as soon as I stood to really push it.
Put the chain back on and all was good, even through a few rolling back roads. About 4 miles in I hit a 8+ grade and snap....thought I threw the chain...nope it broke....I was really digging on this hill too...like 4mph max
One of the links was mangled. I'm thinking maybe when i pressed the pin back in I twisted the link a bit? I'm hoping that's what was causing me to throw the chain too.
I'm going to replace the link for now, and just replace the chain a little later.
|
|
|
|
|
 Logged
|
|
|
|
 Topic Name: Budget build... Topic Name: Budget build...
|
Reply #6 on: July 15, 2011, 07:15:55 PM
|
BigRingRider101
Posts: 21

|
 |
« Reply #6 on: July 15, 2011, 07:15:55 PM » |
|
The chain has to be totally straight to saty on. By this I mean the cog and the chain ring have to be in line
|
|
|
|
|
 Logged
|
|
|
|
 Topic Name: Budget build... Topic Name: Budget build...
|
Reply #7 on: July 16, 2011, 11:34:49 PM
|
CrazyAboutUltras
Location: Arlington, TX
Posts: 13


|
 |
« Reply #7 on: July 16, 2011, 11:34:49 PM » |
|
It appears to have just been that bad link. Got everything replaced this evening and buzzed it up the hill with no issues at all.
Hopefully time will warrant test ride #2 tomorrow.
Chain line looks good just eyeballing it.
|
|
|
|
|
 Logged
|
|
|
|
 Topic Name: Budget build... Topic Name: Budget build...
|
Reply #8 on: August 15, 2011, 09:35:33 PM
|
CrazyAboutUltras
Location: Arlington, TX
Posts: 13


|
 |
« Reply #8 on: August 15, 2011, 09:35:33 PM » |
|
So alot has changed since the project started.
My friend has bailed out of the adventure(before we even got started). So its just me and I decided to just finish up the Fischer and see how it goes. I have been planning to get everything done in time for my first overnighter this weekend. Its gonna be close.
I have finally gotten the chain line riding nice. Brakes are adjusted, hubs greased, etc. Still need a new seat, would love a new handlebar, but that will have to wait...
So I started sewing my bags. I have never sewn before....
First attempt I broke a borrowed sewing machine...LOL repair shop said it'd be cheaper to buy a new one. Something about the gear that drives to rotary hook broke.
So I did on craigslist...$50
Second bag came together nicely, flipped it inside right, and I realized forgot to sew on the velcro straps to connect it to the frame...I know stupid. I then tried to cut the stitching apart and I sewed them on. Finished up, flipped, yep facing the wrong side...LOL
Third attempt, I started fresh, took my time, double and triple checked myself, and the bag came out great....so far.
At this point I decide I want to build my own collapsible wood burning camp stove...
This resulted in my test stove tumbling over leaving a nice char mark on my driveway. My metal of choice was too thin.(pictures coming soon). I have yet to get back to this project, but I am thinking about rolling the edges to help it be sturdier.
In between all of this my road bike has developed a noisy bottom bracket that is becoming concerning, my Jeep has started leaking coolant, and I blew a ton of money on my vacation...
As of right now, with the bags I have finished I will probably still do the overnight trip. I can probably carry more in a backpack than I want, but it is only an overnighter.
Pictures to come soon...
|
|
|
|
|
 Logged
|
|
|
|
 Topic Name: Budget build... Topic Name: Budget build...
|
Reply #9 on: August 15, 2011, 11:54:03 PM
|
em.T
Posts: 3

|
 |
« Reply #9 on: August 15, 2011, 11:54:03 PM » |
|
I'm enjoying your journey - great perseverance.
|
|
|
|
|
 Logged
|
|
|
|
 Topic Name: Budget build... Topic Name: Budget build...
|
Reply #10 on: August 19, 2011, 03:55:11 PM
|
ImAFred
Big B
Location: Las Vegas NV
Posts: 139

|
 |
« Reply #10 on: August 19, 2011, 03:55:11 PM » |
|
Subscribed
|
|
|
|
|
 Logged
|
I dig dirt!
|
|
|
 Topic Name: Budget build... Topic Name: Budget build...
|
Reply #11 on: August 19, 2011, 08:04:01 PM
|
CrazyAboutUltras
Location: Arlington, TX
Posts: 13


|
 |
« Reply #11 on: August 19, 2011, 08:04:01 PM » |
|
and a few pics of the stove... BTW I rolled the edges of the metal and it made for a much sturdier platform. Also the holes drilled into the top for the pot were not nearly enough. I double what I had and will probably end up making it more of a grate. The sharp hinge screws will be replaced by nuts/bolts/locktite, and cut to fit a little more flush. I will explain the idea behind the triangular design when I have more pictures to show a completed project. And I am still not sure it is going to work like I have it in my head...lol 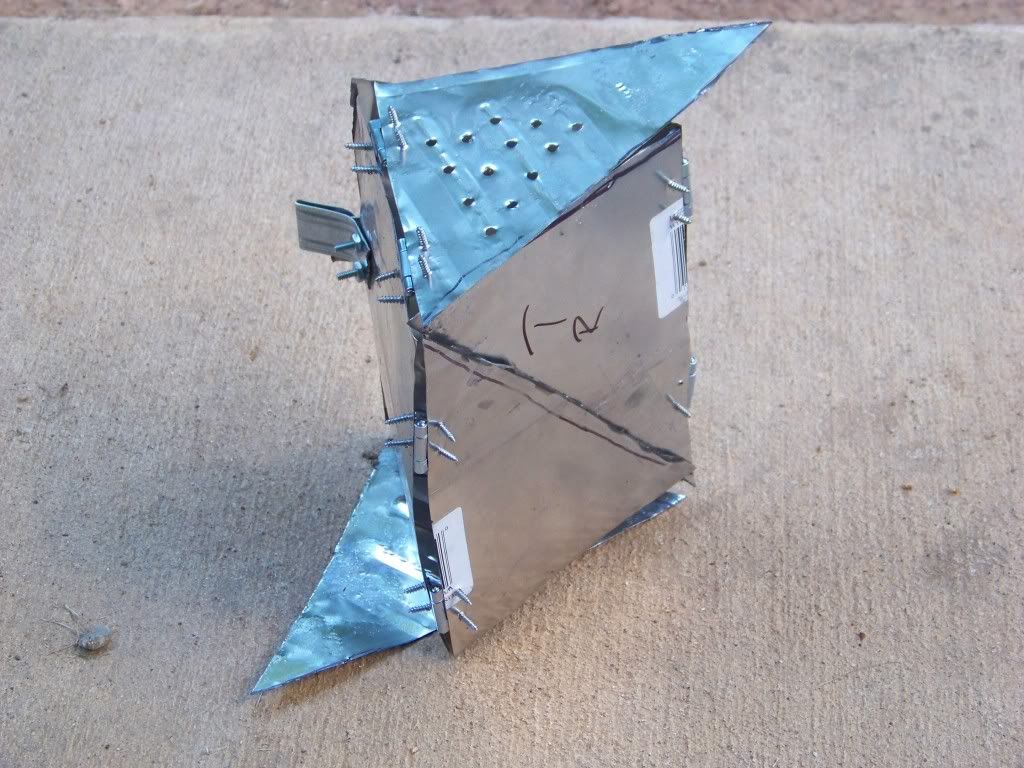 Folded... 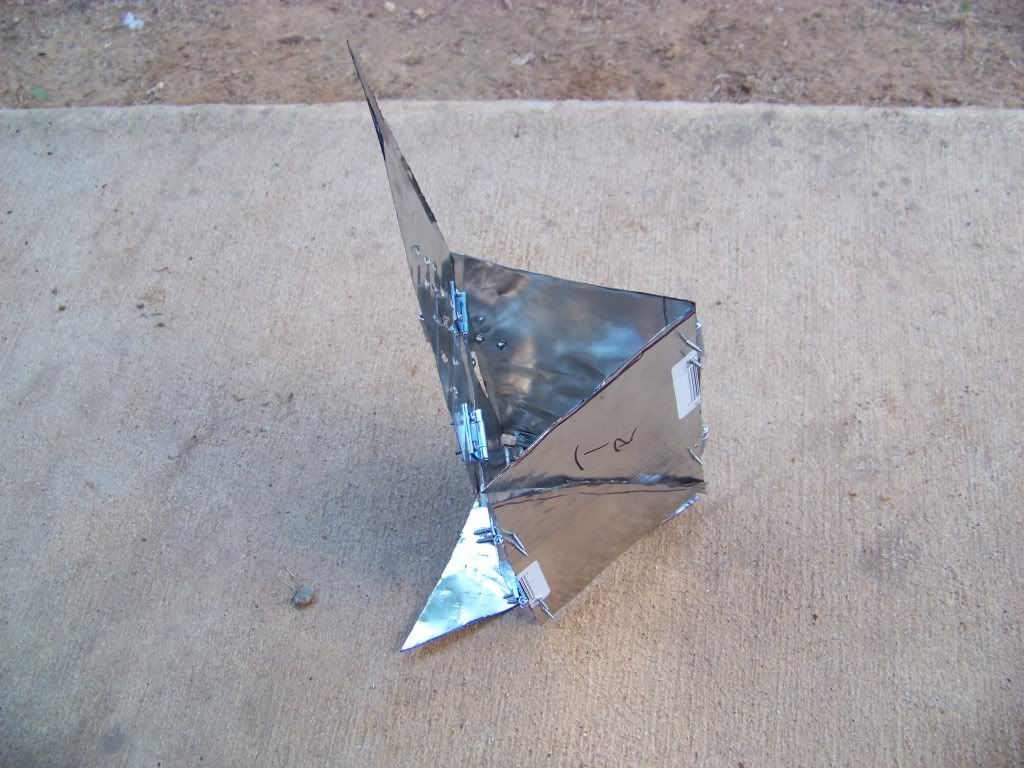 Top open... 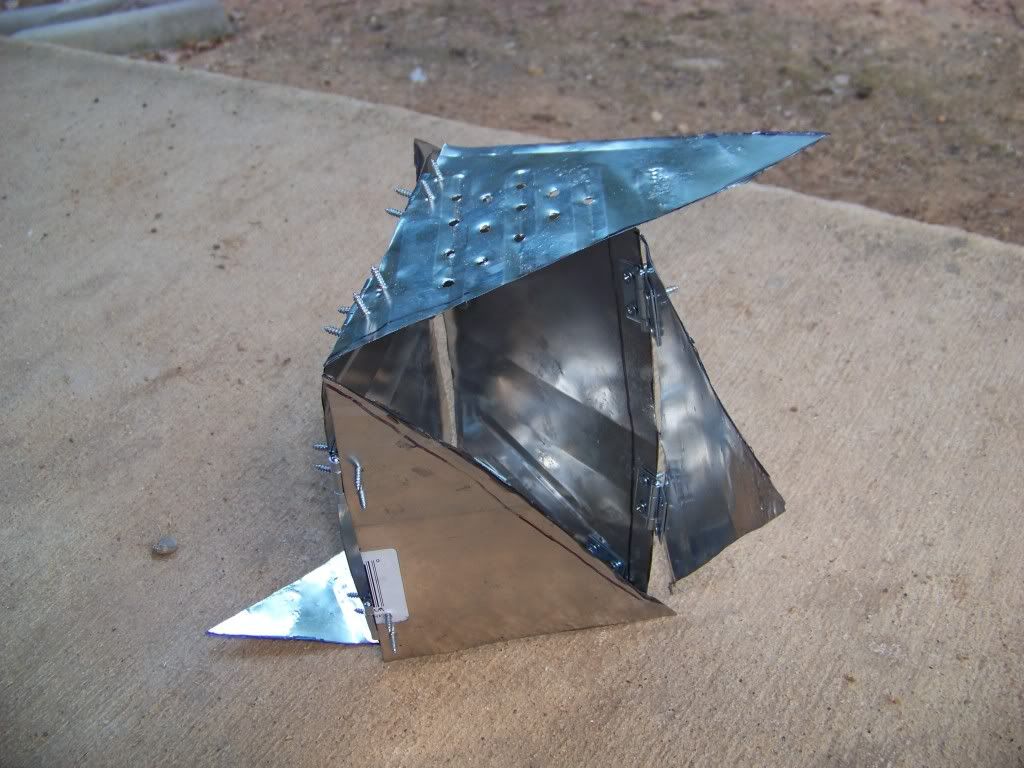 Side load door and top up... 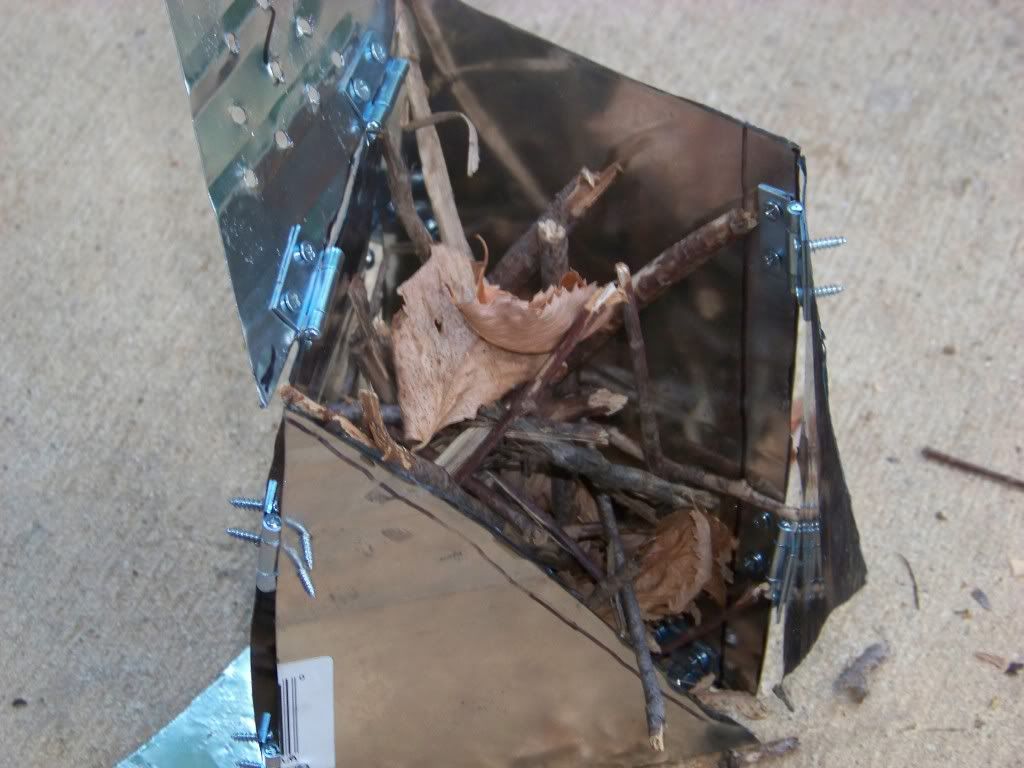 Loaded up with wood(not nearly enough BTW) 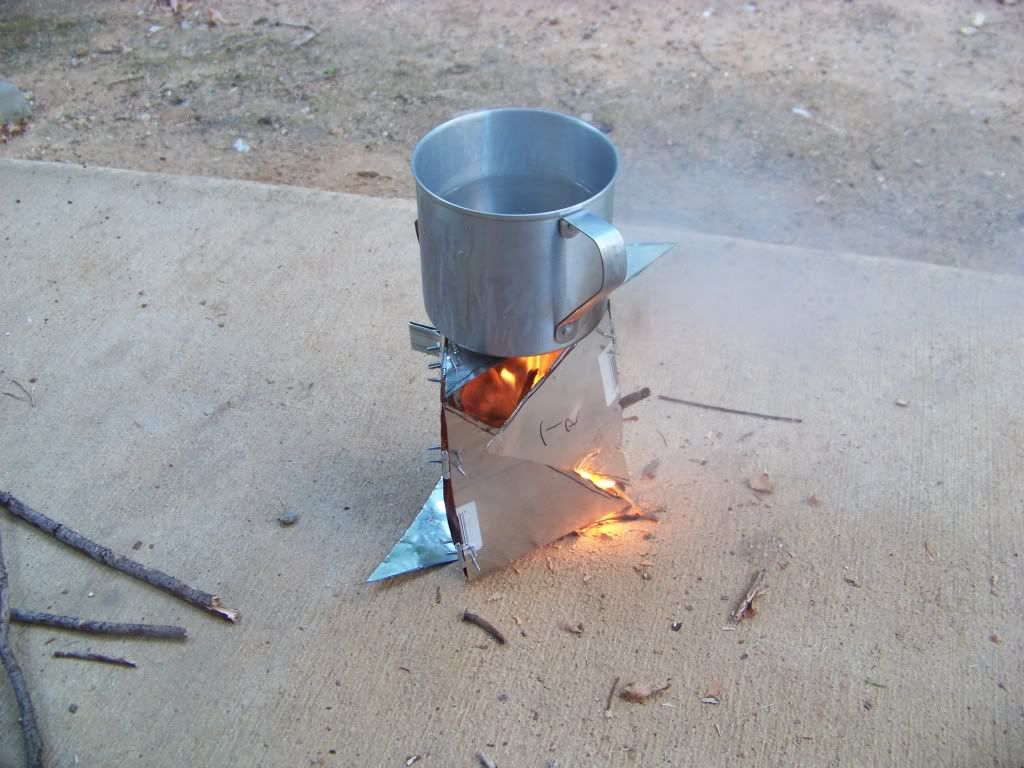 Looking good with a pot of water... 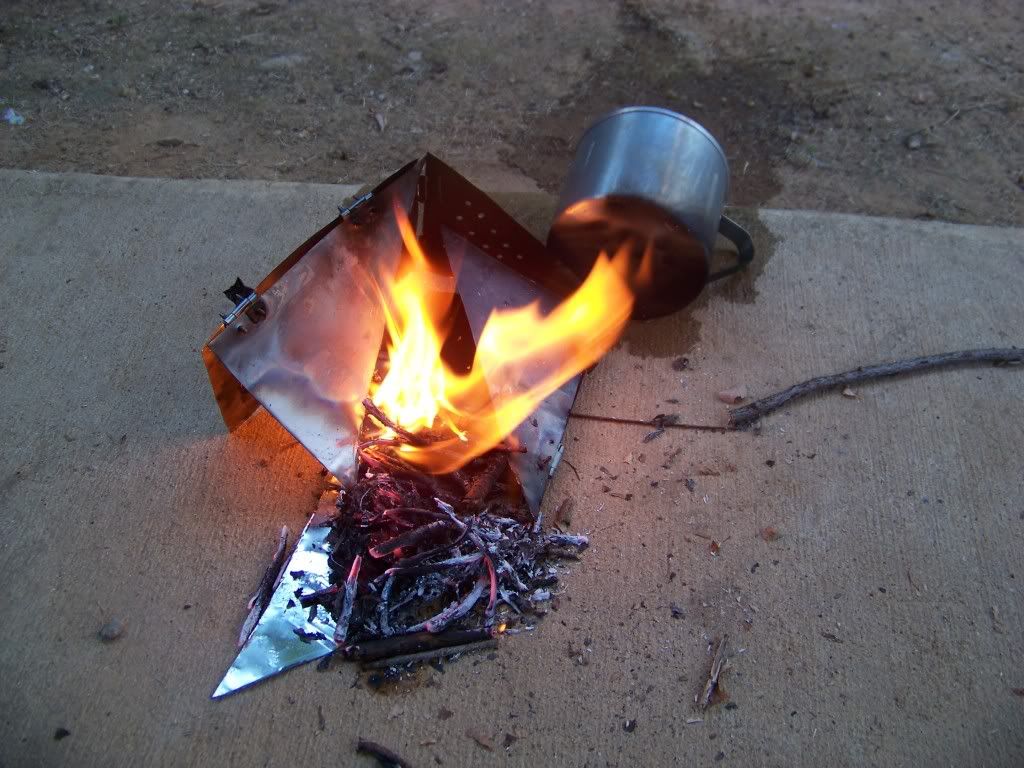 Disaster strikes...lol...it toppled under the weight... Field test was supposed to be happening right now..BUT...the Jeep decided to crap a waterpump so that is my current focus for the weekend...I will get in an overnighter soon tho...oh and the bags are progressing nicely... Jeremy |
|
|
|
|
 Logged
|
|
|
|
 Topic Name: Budget build... Topic Name: Budget build...
|
Reply #12 on: August 20, 2011, 03:15:05 PM
|
CrazyAboutUltras
Location: Arlington, TX
Posts: 13


|
 |
« Reply #12 on: August 20, 2011, 03:15:05 PM » |
|
So I started my day with a McDonalds Caramel Cafe Frappe(large)...Needless to say I have been super productive... Water-pump is installed on the Jeep. Bike bag number 1 completed and mounted(dont burn the loose threads to make a clean appearance because it burns the fur off your velcro and you'll have to sew on new velcro  ...). Camp stove modified(rolling the edges provided the support needed to stand and support a pot) and mounted. So for the pictures. As you can see I have done something a bit different. I was nervous going about this because I had not seen it done before. It is an unusual place for bags. I knew just putting bags there would bulge into the path of the tire and rub constantly. I thought about just putting a plastic piece behind it to keep it away from the tire. That is when I thought hey why not make hat double as a camp stove. So the following is what I came up with. Now these are all very basic designs, made with very basic tools. The edges are still rough and it is coated in black soot. The pics are only of one side. The other side will be identical. The 2 triangle of metal fold and come together to build the stove. The bags will likely carry food, maybe dry firestarter, etc... Fully mounted... 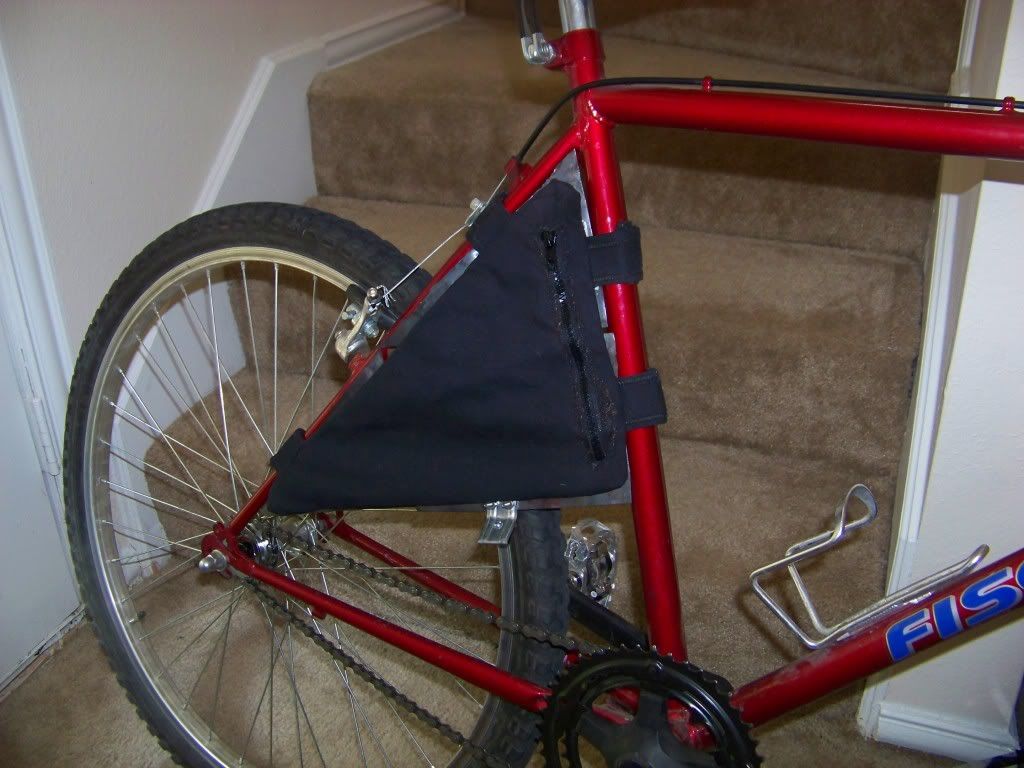 What it looks like behind the bag... 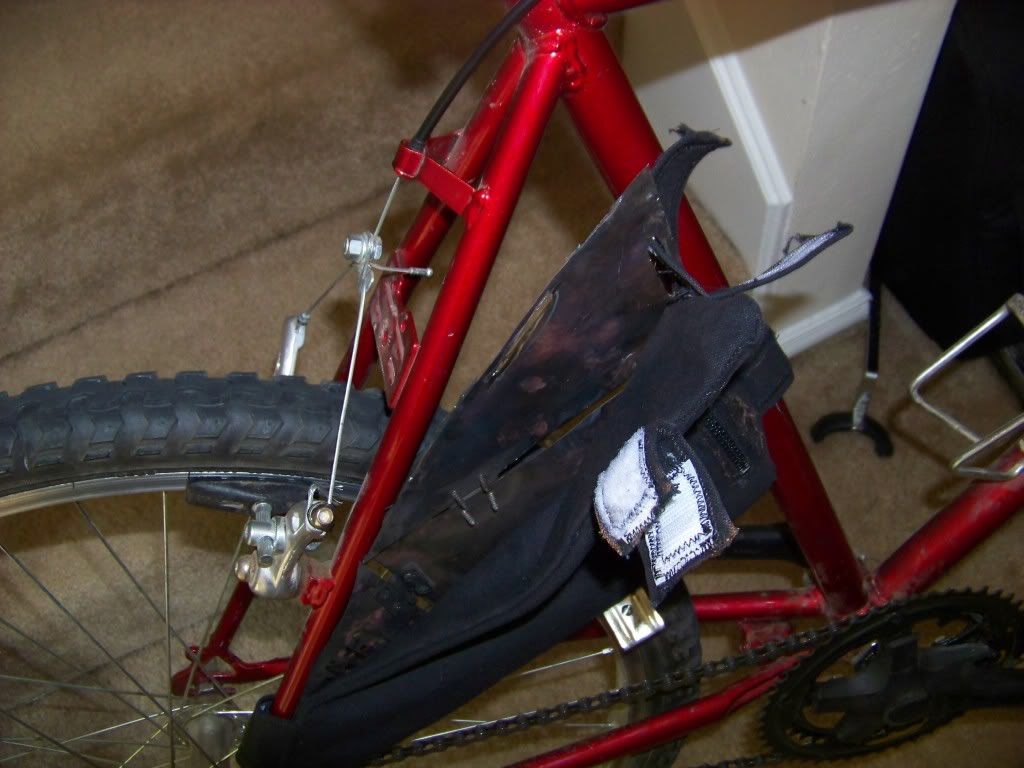 From the other side(their will be a bag on this side soon) 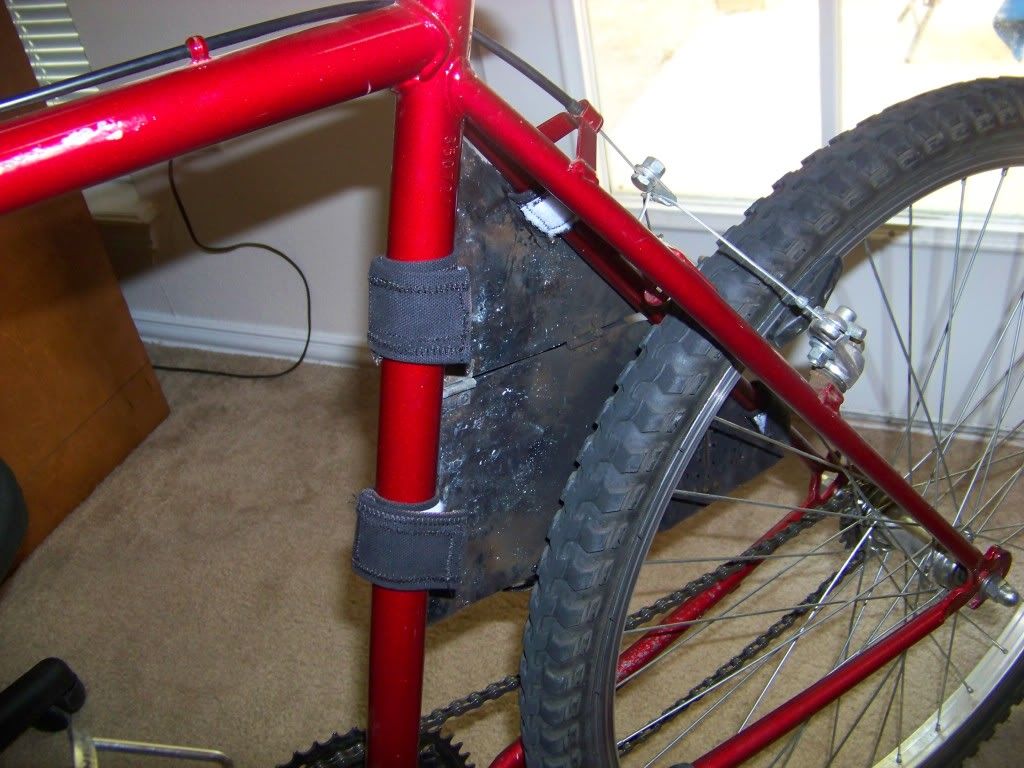 And from the back... 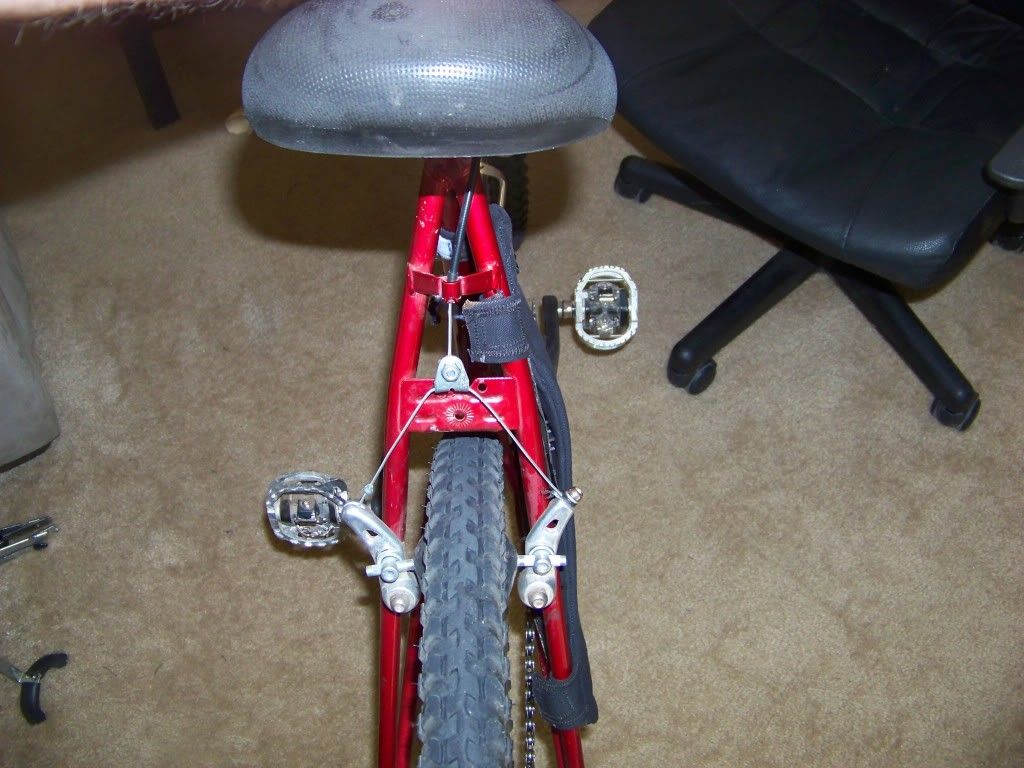 Should have enough clearance from the tire. Also I have about 2-2.5 inches from the bag to my foot. Thats probably more that the bag would bulge if I maxed it out. So lets hear it....is this gonna or did I overlook so fatal design flaw. Certainly there has to be a reason no one has mounted a bag here before... Thanks for reading Jeremy |
|
|
|
|
 Logged
|
|
|
|
 Topic Name: Budget build... Topic Name: Budget build...
|
Reply #13 on: August 21, 2011, 07:58:55 AM
|
ImAFred
Big B
Location: Las Vegas NV
Posts: 139

|
 |
« Reply #13 on: August 21, 2011, 07:58:55 AM » |
|
Very creative way to think outside the box errrr I mean frame....as long as there is no rubbing of foot or tire you should be good to go
|
|
|
|
|
 Logged
|
I dig dirt!
|
|
|
|
|