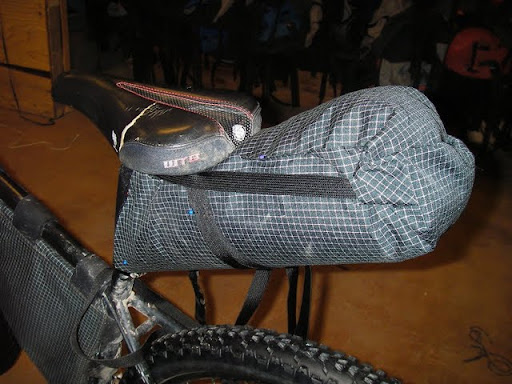
Homemade seat bag V1

Flexible cutting board, fold to shape, and cut the correct angle at the seatpost. Take some cardboard, cut into a triangle to fit the edges of the cutting board. The cutting board will be the frame sheet for the bag, the cardboard is a pattern piece.

Cut fabric to match cutting board, plus seam allowance, plus 6" more length for the roll up closure.
Cut triangle fabric to match cardboard, plus s.a. plus 6" more length.
I first cut the 6" extension as a square at the end of the triangle, but after pinning it up, realized the opening was far too small, so cut a new triangle that kept getting wider until the end of the extension. This also makes the width of the triangle equal to the width of the bottom piece at the opening, making for an easier closure.

With the cutting board pinned together, the whole velcro/cutting board/fabric piece twisted around to one side of the seatpost, as I suspected. This interface needs to have some width to get the cutting board going onto either side of the post.

Pinned together with the correct top piece, the proper closure around the seatpost, and a Golite Coal synthetic jacket stuffed inside.

Sewed reinforcement pieces for the straps and tacked them on. Here are all the main pieces, ready to get connected.

Sewed the edges of the bag together. Getting the velcro sewed in for the next step was really tight, and is lacking in aesthetics, so next time I would sew the velcro onto the bottom piece before sewing the top triangle on. My first thought was that the cutting board would need to be sewn into the seam with the velcro and fabric, but this is not necessary.
I also duct taped the edges of the cutting board lots to protect the fabric, and added a reinforcement patch to the triangle underneath the seat. When everything else was done, I added reflective tape, trimmed the straps, and sewed the cutting board in tight at the opening, to help stabilize it. For later modifications, I can easily seam rip this out and get the cutting board out.


All done! A wool sweater is stuffed in there now.
Now, it needs some thorough testing....
Many thanks to Epic Designs and Carousel Design Works for this innovation, for inspiration, and for detailed pictures for me to go off of.
Time - about 4 hours
Skill - smart research (browsing Epic and Carousel pics) and smart planning, but the sewing itself was basic.
Use lots of pins to check your work before sewing anything. Note I had the whole thing strapped on the bike with a jacket in it before sewing anything.