Pages: [1]
Reply Reply New Topic New Poll
  Topic Name: Seat Bag! on: January 25, 2010, 09:59:01 AM
jeremy11


Location: Grand Junction, CO
Posts: 263


View Profile WWW
« on: January 25, 2010, 09:59:01 AM »

Homemade seat bag V1


Flexible cutting board, fold to shape, and cut the correct angle at the seatpost.  Take some cardboard, cut into a triangle to fit the edges of the cutting board.  The cutting board will be the frame sheet for the bag, the cardboard is a pattern piece.


Cut fabric to match cutting board, plus seam allowance, plus 6" more length for the roll up closure.
Cut triangle fabric to match cardboard, plus s.a. plus 6" more length.
I first cut the 6" extension as a square at the end of the triangle, but after pinning it up, realized the opening was far too small, so cut a new triangle that kept getting wider until the end of the extension.  This also makes the width of the triangle equal to the width of the bottom piece at the opening, making for an easier closure.

With the cutting board pinned together, the whole velcro/cutting board/fabric piece twisted around to one side of the seatpost, as I suspected.  This interface needs to have some width to get the cutting board going onto either side of the post.


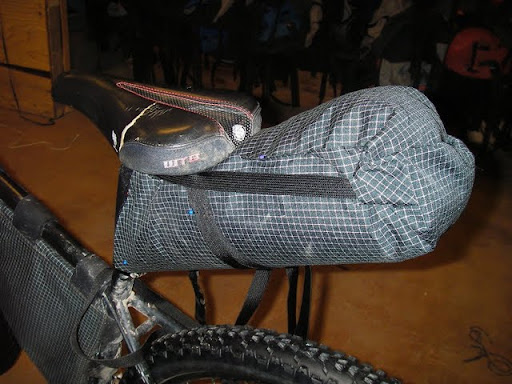
Pinned together with the correct top piece, the proper closure around the seatpost, and a Golite Coal synthetic jacket stuffed inside.


Sewed reinforcement pieces for the straps and tacked them on.  Here are all the main pieces, ready to get connected.


Sewed the edges of the bag together.  Getting the velcro sewed in for the next step was really tight, and is lacking in aesthetics, so next time I would sew the velcro onto the bottom piece before sewing the top triangle on.  My first thought was that the cutting board would need to be sewn into the seam with the velcro and fabric, but this is not necessary.

I also duct taped the edges of the cutting board lots to protect the fabric, and added a reinforcement patch to the triangle underneath the seat.  When everything else was done, I added reflective tape, trimmed the straps, and sewed the cutting board in tight at the opening, to help stabilize it.  For later modifications, I can easily seam rip this out and get the cutting board out.


All done!  A wool sweater is stuffed in there now.

Now, it needs some thorough testing....

Many thanks to Epic Designs and Carousel Design Works for this innovation, for inspiration, and for detailed pictures for me to go off of.

Time - about 4 hours
Skill - smart research (browsing Epic and Carousel pics) and smart planning, but the sewing itself was basic.
Use lots of pins to check your work before sewing anything.  Note I had the whole thing strapped on the bike with a jacket in it before sewing anything.

Logged

  Topic Name: Seat Bag! Reply #1 on: January 25, 2010, 10:07:14 AM
mattinaustin


Posts: 55


View Profile
« Reply #1 on: January 25, 2010, 10:07:14 AM »

Great job!  I really like how simple your approach is.  This is next on my project list.

Gotta love those thin flexible cutting boards.  I used them to wrap my handle bar bag since I was getting the occasional tire rub on big hits and also to protect against the various cables rubbing into the bag.
Logged

  Topic Name: Seat Bag! Reply #2 on: January 25, 2010, 11:35:53 AM
sean salach


Location: palmer, ak
Posts: 253


View Profile
« Reply #2 on: January 25, 2010, 11:35:53 AM »

Awesome! looks great. Keep us updated on how it works out. I'm debating a seatbag vs light rack with lightweight drybag+.
Logged

  Topic Name: Seat Bag! Reply #3 on: January 25, 2010, 12:32:32 PM
fat bob


Location: Denver, CO
Posts: 76


View Profile
« Reply #3 on: January 25, 2010, 12:32:32 PM »

Nice job... the more I see people do their own, and read about what it takes, the more I appreciate that Epic and Carousel are out there for people like me with zero skill.
Logged

  Topic Name: Seat Bag! Reply #4 on: January 25, 2010, 12:37:29 PM
jeremy11


Location: Grand Junction, CO
Posts: 263


View Profile WWW
« Reply #4 on: January 25, 2010, 12:37:29 PM »

Nice job... the more I see people do their own, and read about what it takes, the more I appreciate that Epic and Carousel are out there for people like me with zero skill.

well put.  My stuff is all V1 or V2, and looking at their pics, they offer far more options than I would care to figure out, and far better refinement.  These guys do incredible work and are well worth the price.  It is usually cheaper making your own stuff, but mainly I do it because it is so much fun!
I'm pretty sure one of them was the first to make this style of seatbag.  Excellent idea!
Logged

  Topic Name: Seat Bag! Reply #5 on: January 25, 2010, 01:29:55 PM
Pivvay

Riding and exploring


Location: Westminster, CO
Posts: 681


View Profile WWW
« Reply #5 on: January 25, 2010, 01:29:55 PM »

Awesome! looks great. Keep us updated on how it works out. I'm debating a seatbag vs light rack with lightweight drybag+.

Summer or winter Sean? What's going in it?

Nice work on the seat bag sewing Jeremy!
Logged

-Chris Plesko

  Topic Name: Seat Bag! Reply #6 on: January 25, 2010, 02:53:08 PM
sean salach


Location: palmer, ak
Posts: 253


View Profile
« Reply #6 on: January 25, 2010, 02:53:08 PM »

Winter. It'll be all my extra clothes. Pretty light. I'm going to need to try out a seatbag on a few rides. The only real downside I can see is how it sticks up above the back of the saddle, which might make it tougher to swing my leg over. With a rack, I can also strap a bunch of other stuff to it if needed as well. I dunno. Maybe I'll come up with some sort of combo deal. A lower hanging seat bag with an aluminum strut that runs down to the seat stays for support....
Logged

  Topic Name: Seat Bag! Reply #7 on: January 25, 2010, 03:23:18 PM
Pivvay

Riding and exploring


Location: Westminster, CO
Posts: 681


View Profile WWW
« Reply #7 on: January 25, 2010, 03:23:18 PM »

I've got my clothes in the big Epic seatbag. Nice amount of room, little pocket on top for the little things (mask, ear band, etc) and my puffies and spare clothes in back. Extra food can go in there as well when needed. Is it better than a rack/stuff sack? I'm not 100% sure yet. In summer I'd say it's much better for sure. For winter I'm too green to give a definitive answer yet.
Logged

-Chris Plesko

  Topic Name: Seat Bag! Reply #8 on: January 26, 2010, 10:24:41 AM
jeremy11


Location: Grand Junction, CO
Posts: 263


View Profile WWW
« Reply #8 on: January 26, 2010, 10:24:41 AM »

First ride last night, up Slumgullion pass.  Pretty much forgot it was there, until I needed to get my extra mittens out on the descent, then it opened and shut quickly with my cold fingers.  Then my DIY puffy mittens got my hands warmed back up again.
Next time I would add more than 6" extension past the end of the cutting board, and move the closure compression straps down a little on the seatpost, so the bag angles a little lower down.
Logged

  Topic Name: Seat Bag! Reply #9 on: January 26, 2010, 12:06:32 PM
boddunn


Location: Kirby Muxloe, England
Posts: 86


View Profile
« Reply #9 on: January 26, 2010, 12:06:32 PM »

Nice work again Jeremy, I'm gonna have a go this weekend and also try and find time to post my trial and tribulations from making my frame bag.
 thanks for the inspiration!
Logged

  Topic Name: Seat Bag! Reply #10 on: September 27, 2010, 09:55:11 AM
pattatat


Posts: 1


View Profile
« Reply #10 on: September 27, 2010, 09:55:11 AM »

What type of fabric did you use?
I'm looking at maybe using 500 denier Cordura, I've never felt/used it so I don't know if its the right choice.
Bag looks great BTW.
Logged

  Topic Name: Seat Bag! Reply #11 on: October 04, 2010, 11:05:29 PM
DelNorte


Posts: 6


View Profile
« Reply #11 on: October 04, 2010, 11:05:29 PM »

Looks great! I think that just served as inspiration to make my own custom frame bag!
Logged
  Pages: [1]
Reply New Topic New Poll
Jump to: